As an audio engineer, music producer, or audio gear enthusiast, you will agree that sometimes, getting a rack mount could take your set-up to an entirely new level. There are several advantages of getting your studio gears rack-mounted.
Rack mounting your gears saves space and gives you a cleaner workspace, especially if you are the type that freaks out when things are not in order. It also helps you get easier access to the front panel and knobs of your beloved gears.
Rack mounts also add extra layers of protection to your audio gears. This is true because you will have to screw the gear to the rack, which means you will not have to worry about it falling off your desk during those very rare or not-very-rare instances.
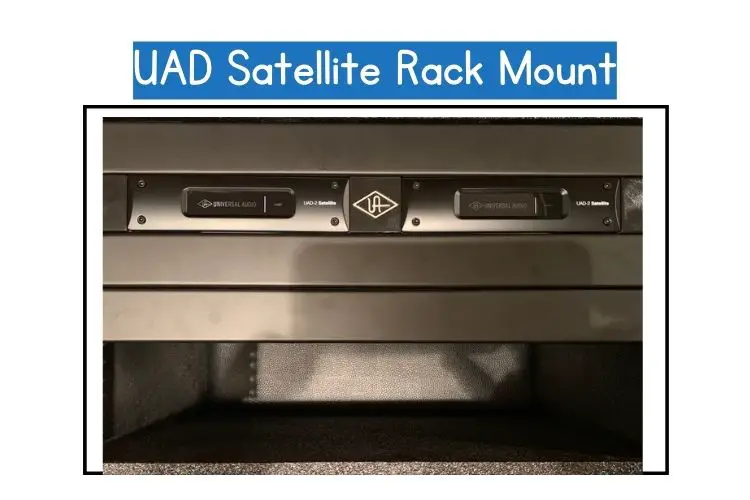
The UAD Satellite is an amazing studio gear. But quite unfortunately, Universal Audio doesn’t make rack mounts for the UAD Satellite.
This makes it a bit disappointing for buyers who would love to rack mount the UAD Satellite.
In this article, we will discuss possible alternatives and some DIY solutions to getting your UAD satellite rack mounted.
Table of Contents
How to Rackmount the UAD Satellite – DIY Solution
The kind of DIY solution that will work best for your needs boils down to your technical skills, how comfortable you are with DIY and the kind of tools and accessories you have at your disposal.
The end result is just to create a rack that you use for the UAD satellite device but there are different ways to approach this problem.
Here are some of the easiest and most cost-effective solutions that will give you an aesthetically appealing and durable rack for your hardware.
Hard Install Directly Into Rack
The easiest solution is simply to hard install the actual device into the AC rack itself. However, the AUD Satellite doesn’t come with any mounting nuts or a flange on the front panel.
Instead, you will use three nuts on the side of the panel and mount it through those to the rack.
These nuts are not used for any purpose and are most likely installed from the factory to cover up the prefabricated nut holes in the side of the body.
If your audio rack has nuts on the side that can line up with even two of the nuts on the side of the device, this can work. Since the device is so small and light, even just mounting from one side will not be a problem.
However, this will not look very nice if you have a larger rack. If you can get past the visual aspect, this is a quick fix. You can even use the nuts that come with the unit from the factory.
Customize A Blank Panel
A slightly more advanced option is to fabricate your own panel from a bank rack cover. You might have one of these rack covers at home (that came with the rack) or you can buy one online.
Just make sure you get the right size for the width of your rack and one that has the right nut pattern on the front. Cut the panel in half to make brackets for either side of the device.
Using a small metal grinder you will cut away a small portion in roughly the centre of one of the two pieces that you cut. Do this for both pieces so you end up with ‘L’ shaped bars for the left and right side of the device.
Next, you’ll also need a drill to make some holes on the side that will connect to the side of the device. You will already have holes cut out for the front on the blank panel that you get.
With your brackets cut, bent and drilled, you can get straight to assembly. Using the supplied nuts or with a new set of screws, secure the brackets to the sides of the device and check to make sure it is a snug fit.
If there is some room you can always add a bit of cardboard to any other filling to make sure it fits tight with the bracket. Lastly, screw the front of the panel into your rack and you are good to go.
For a cleaner finish, you can repaint the brackets since the paint will peel off the bend when you create the bend in the bar. Here is a video showing this process.
Fabricate A Panel
If you want the absolute best and you don’t mind investing more time and money then it would be a good option to fabricate a panel from scratch.
You can customize it according to a certain material you want to use, the size, shape, pattern and overall functionality of the bracket.
If you want to pair the UAD Device with something else in the same rack that needs a specialized bracket, you can do that when you fabricate something from scratch.
Just make sure it is a material that won’t generate excessive heat or unwanted electrical signals.
Some people prefer to use 3D printers while others may be happy to make something out of metal. In this case, you will have to measure things according to your needs and make adjustments accordingly.
Tools You Will Need to Rack Mount the UAD Satellite
Installing a mount will typically not require any very advanced, large or expensive equipment.
However, if you plan on fabricating the mount from a special material then you will need some specialized equipment as well.
In most cases just having the tools mentioned below will be enough to get you through the installation process.
Small Metal Grinder
A grinder will come in handy whether you need to cut a blank panel according to your size or if you need to cut through other materials including hard plastic, wood, or even recyclable materials to cut the mount itself or additional components.
This is a good option to consider. Moreover, you can change the head on this grinder and use it for finishing or even polishing the final product. This is a versatile tool you should definitely have in your house.
Table Vise
Whether you are glueing components together, welding or just bending them to shape with some elbow grease, having a sturdy vice will be helpful. Here is a good option to look into.
Just make sure you have a sturdy work surface to which you can attach this. The vice can generate a lot of torque, so if the work surface isn’t properly secured to the floor it can defeat the purpose of this tool.
Allen Keys
If you have a look at the AUD satellite device you will notice that the nuts on the side, the ones you will be using to mount the brackets, are Allen heads.
You will need an Allen tool/Hex set to undo and fasten these. This is a good option to look into.
Screwdriver
The screws on the front of the panel, and those on your rack already, will most likely be standard screws with a Philips’s head. In this case, get this option to help you secure these screws.
Alternatively, you can also easily find all these tools and components at your local hardware store.
It would also be a good idea to pick up some metal washers and a mixed bag of screws just in case you need longer or shorter ones.
The metal washers will help you get a more secure fit on the rack and on the device in case there is a bit of extra wiggle space with the screws.
If you are tight on a budget then you can also pick up these tools from garage sales or buy them used to save some money. Especially for things like the vice or the metal grinder, buying them used can save you a lot of money.
These are durable bits of equipment so as long as the condition is relatively clean you should have no problems buying them used.
Alternatives for People Who Can’t go the “DIY Way”
If you don’t want to hassle yourself with the job of building and fabricating components for your UAD Satellite and AV rack, there are some premade options that you can consider.
Unfortunately, UAudio doesn’t make racks for these devices so there is no ‘OEM’ option to consider. However, there are a number of third-party products that you can look into.
Brackets and Trays for the UAD Satellite
The first options to consider are racks that are made specifically for the UAD Satellite.
These racks have the cutouts made exactly according to the face of the unit and also cutouts for the screws exactly according to the outlay of the screws on the side of the unit.
However, these brackets are only designed to work with the UAD Satellite unit itself.
The other end of these brackets may be too long/short for your AC rack or the thickness of the inserts might not be so that it gives you a completely flush look.
In most cases, you will be able to find third-party UAD Satellite racks that are designed for generic AC rack sizes such as 1U-4U. Alternatively, you can also go for entire trays that are designed to house the UAD Satellite.
Rather than just brackets that attach the device to the rack, this way you get an entire tray that will house the device and will take an entire slot on the rack itself.
This way you get much better protection for your device, there are usually multiple installation options for the tray and you also don’t have to deal with a half-empty shelf since the device is quite small. If you are already short on space then this might be such a great option.
Generic Brackets
Another option is to get a standard bracket designed for the size of the rack that you have. In most cases, the manufacturer of the rack will also sell aftermarket brackets and trays.
These aren’t designed for any specific hardware but they have screw openings placed in universal places so you can easily get at least two nuts to attach to the device and into the rack.
For such a small and light device just two nuts will be enough. Plus it will save you a lot of time as compared to building your own. These are made out of metal so you don’t need to worry about durability either.
Open Trays
If you can’t find anything to suit your needs then there is always the option to get an open tray.
You can get the ones that have screw openings for the rack with the option to customize screw openings for the kind of device you will be installing on the tray.
Again, the most important thing is to get the right size in terms of both width and height.
These are quite inexpensive and some even have universal screw openings already on them. If they don’t, it doesn’t take much work to drill out a couple of holes in the device.
Why It is Important to Rack Mount Your UAD Satellite
Since it is such a small device, people often wonder whether rack mounting is even necessary. On a good-sized workstation, it doesn’t take much space at all so why go through the hassle of customizing the rack for it?
There are quite a few important reasons why.
Save space – When you have multiple devices, multiple screens, MIDI controllers, monitor speakers, and a plethora of other small devices on your table for easy access, it can get cluttered. Having all your devices packed into the rack saves a ton of space.
Safety – You could spill things on your table, you could knock the device off the table, and a range of other problems could arise. When you have your device locked into the rack it is far safer for the device and for you.
Ventilation – Audio equipment can get extremely hot and on a crowded worktop, ventilation can be quite terrible. With your device in the rack, you have much better airflow and this is excellent for the overall performance and longevity of the device.
Access – Having the device in the rack makes it that much easier to access controls from the front of the device. Something that can be hard when it is laying flat on a table.
Wiring – With all your wiring routed through the back of the rack you have much better cable management and a much lower chance of the wiring getting damaged due to pressure or poor installation.
Convenience – With all your gear in a rack you can easily unplug it all and move it around or through it in a locked closet for security when you are away. It is much easier to manage a tower of devices rather than a dozen devices scattered around the space.
While You Are Yet to Rack Mount Your UAD Satellite; How to Care for It
If you are still deciding on which rack mount to go for then it will help to know how you should take care of your device while it lives on your tabletop.
The most important factors are electricity control and ventilation. Make sure you have all your electronics connected to an extension cable or a power socket that has a voltage regulator on it.
When these devices heat up they tend to spike power input and output which can fry the entire device. The voltage regulator will trip and cut power as soon as it reaches a dangerous level.
Secondly, make sure you have good ventilation; especially near the fans of the device. On the UAD Satellite and many other audio devices, the ventilation fan and the heatsink fins are located at the back of the device.
You also want to place devices at a safe distance from each other to minimize magnetic and electric interference from each other.
Other than that keep your device safe from dust and water. Also, try to keep the cables as straight as possible to prevent damage to the wiring which can lead to circuit issues.
Conclusion
With the right racking solution and good maintenance, the UAD Satellite device can provide you with several years, if not decades of service, and excellent audio quality.
A good rack management setup will make the devices not only last longer but it will make your user experience that much smoother and enjoyable.
![Kaotica Eyeball vs Fatboy: ALL You Need to Know [2023]](https://performerlife.com/wp-content/uploads/2022/05/Kaotica-fatboy-211x150.jpg)

![What Happened To “Chief Keef”? [Everything to Know About This Rapper]](https://performerlife.com/wp-content/uploads/2022/05/Chief-Keef-211x150.jpg)