For many voice actors, the landscape of their world has changed forever. With so many people working from home, the need for voice actors to move their work into their own spaces has become more and more necessary.
Making a studio is a crucial step for an artist, but it can be hard to decipher how to create the space online.
Read on to learn all about making a voice acting studio in your own home. With some simple tips and tricks, you should be able to create an impressive reel or lend your hand to a movie in no time at all, right from home.
Table of Contents
Find the Perfect Space
Before you can start creating your voice acting studio, you need to find a space that you can operate within. It should be somewhere separate from your bedroom, where you will be able to focus and record in peace.
When deciding on a space to place your studio, you should consider a few items:
- The thickness of the walls: How thick are the walls in this room? Are they located next to a space that is often full of activity? Will you be disrupted?
- Plumbing problems: Is there something like a toilet or air conditioner that could add to the white noise in the room? Will it disrupt your acting?
- Proximity to the outside: Is there a freeway or busy road that could cause an issue outside?
- Power: Is there power in the room? Are you able to breathe?
Once you’ve satisfactorily answered all of these questions, you’ve found the room that you can start to transform. It is critical to note that a square room is better than a rectangular one, thanks to the acoustics that that shape can provide.
Establish a Budget for the Project
Another critical step before you embark is to set out a budget for yourself. When you are excited about something, it can be easy to spend a lot of money. While that can be fun at the moment, if it’s more than you can afford to pay off, it will bite you in the rear later on.
There are a few items to budget for in this project. Altogether, a solid range for your project should settle around a maximum of $15,000 if you want to keep it cheap.
If you’re doing an entire renovation and creating a space, that number might be a little bit higher. Even at the most, you should stay under $30,000. Write out each cost to make sure you’re on track.
Take the Steps to Soundproof the Area
Once you have your space, you can start to turn it into a location ideal for capturing your voice. Soundproofing is a step that will make your efforts sound quality and professional.
It’s about preventing sound from entering the space, rather than keeping your skills from exiting the room.
There are many quality materials that you can use to soundproof your space. Some of them are more expensive than others, so it is vital to keep your budget in mind when deciding what is best for your studio. We’ll go over a few of the best items that you can use for your space.
Foam
Foam is one of the most common and versatile materials when trying to soundproof a room. It comes in many different forms, making the application easy no matter what your space is.
Foam is also affordable and designed to fit any budget depending on the style that you invest in for your work area.
Some styles of soundproofing foam include:
- Soundproofing spray foam: This substance comes from a can. It works as insulation if you are building from scratch or taking apart the walls to redo them. Filling the space keeps outside noises from coming in.
- Foam wedges: Foam wedges come in individual tiles filled with ridges and divots that help to break apart the noise. They are typically two inches thick and look professional. Your room should be well-ventilated if you choose to use these.
- Foam sheets: These thick sheets can be mounted on the wall in big pieces. You often get more bang for your buck, but they are not designed with the intent of soundproofing.
Foam is a great choice, but if you’re not a fan, there are always other options. It depends on your personal preferences and the price point you prefer to stay at.
Polyester Panels
Polyester panels are another quality option for soundproofing your home. They come with a lot of good features, including being non-toxic and fume-free. This bonus means that the space will be safe for you, kids, pets, and anybody who might be spending a lot of time in the area. These panels come in individual squares that can stick on the wall.
Because of their high density, the polyester:
- Prevents sound from drifting through the walls
- Reduces impact noises
Polyester panels are affordable and can easily be applied to the floors, ceilings, and walls. These sheets can even be cut down with a knife or sharp scissors to better fit the area that you’re applying them to.
Utilize Blankets and Curtains
Though this method is not the most effective, it costs little to nothing since most people already have sheets and blankets inside their homes. Simply hang them from the ceiling and apply multiple layers of fabric to soften the interruptions of the outside world.
These sheets will help you in your recording by:
- Preventing bouncing from occurring when you start the recording process
- Helping to keep outside noise from coming in
- Soften other noises and keep them from interrupting in a harsh manner
If you are looking to spend little to no money on the soundproofing process, go for this one. It will also help to layer blankets and sheets on the floor, placing them into cracks that might be under your door for extra sound prevention.
The thicker you use, the better. If you can find access to quilts or other winter-driven blankets, these will work the best. Dense fur, thick sheets, and layered items will be your best bet more a makeshift soundproofing job like this.
Prop Up Mattresses
Believe it or not, if you have any extra mattresses lying around, they can serve as great makeshift soundproofing walls. You might also be able to find used ones that can work, as long as they are clean enough to keep your space fresh and avoid possible invasion from bugs and other pests.
Mattresses work well in a makeshift situation due to:
- Their thickness: The thickness of the mattress will help to stop an overload of sounds from passing through the walls. It will not be perfect, but it will do if you do not have a noisy home.
- The material: The material is often thick and durable on a mattress. This can help with the dampening and deflection of unwanted noises.
- Their surface area: The vast flat surface of the mattress provides dampening over a wide area. Since there are not any breaks in the mattress, there is no risk of anything sneaking through a crack.
If you happen to have spare mattresses and do not want to spend extra money, utilize these for your walls. However, if your home or area is noisy, this is not the best option. It’s worth it to buy more expensive soundproofing if outside noise is going to be a constant problem.
Carpet Your Floors in Thick Material
The thicker the carpet, the better. A hardwood flooring will not do you much good if you want to be serious about your voice acting career. You don’t have to entirely replace it with thick carpeting, though that might be a good idea if this space is pretty permanent.
Instead, you can buy several thick rugs from a thrift store and layer them to create floor insulation.
Insulating the floor will do the same as if you insulate the walls. By having all sides of your room protected from outside noises, you will be able to have a quality space to act. The floor might not seem critical to the process, but if you are serious, it is.
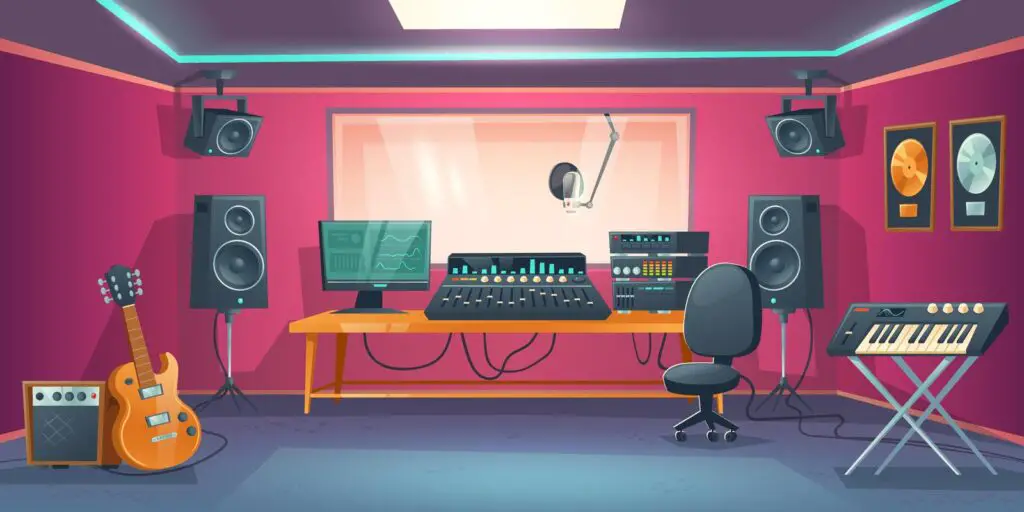
Get a Desk
You will need to invest in a desk that can hold your equipment on top. It doesn’t have to be expensive; it should just be able to support the items that you place on it. It should also be a height that works for you whether you are sitting down or standing up to record.
Some of the best desks on Amazon include:
All of these are under $100 and practical for your space, no matter how big or small it is. Do your research to determine which is right for you.
Invest in a Computer
Hopefully, you already have a computer. If you don’t, now is the time to get one. There are many options, so it can be easy to get lost in all of the selections available to you. We will discuss a few of the best ones for voice actors to use in their field.
All of these work for different price points, so you can select the one that will fit within your unique budget. Computers are expensive, but if this is your career and livelihood, you must invest in one.
MacBook Pro for Voice Over
The MacBook Pro has many features that work well with the needs of a voice actor. These can be a little expensive, with the current Amazon price resting at around $1800.
However, many things come with this device that will serve any voice actor well as they begin to progress in their career.
The MacBook Pro offers:
- A decent-sized screen: The MacBook Pro offers a 16-inch screen. This is plenty of room to be able to see the applications you need and even pull up your script at the same time.
- A high-end processor: A processor allows the computer to run programs on your device much more smoothly.
- A fast storage area: This allows you to use multiple tabs at once, no matter how much processing they need.
- Great battery: The battery lasts a much longer time when compared to other laptop models.
- A sleek design: No one can beat the MacBook in design. It’s sleek, portable, and sturdy.
All in all, the MacBook Pro will give you a lot for your dollar. If you have the budget, this is one of the best laptops that you can buy for your career.
Razer Blade Laptop
The Razer Blade Laptop is not an Apple product, but it has certainly made a name for itself. At a cost of around $2000, it pulls more out of your pocket than the MacBook. This might push you away. However, there are a few reasons why this laptop costs a bit more.
The Razer Blade Laptop offers benefits such as:
- The design: Though not quite as sleek as the MacBook, the Razer also gives those who use it a quality design that makes it portable if you need to move.
- The display: The display is clear and fast, intended for gamers but good for any program that is run.
- The battery life: This one lasts the longest out of all of our suggestions. It won’t die for about six and a half hours, plenty of time to get in some substantial recording time.
The Razer costs a bit of money, but it is another quality laptop that you can feel safe spending your money on. It will help to further your career.
Microsoft Surface Pro 6
The Microsoft Surface Pro is the cheapest of the options, coming in at around $760 on Amazon. This is partly because it is not a laptop – it’s a tablet. However, it has many of the same abilities as them, if not more for voice acting.
The Microsoft Surface Pro has:
- Quality performance: On the Surface Pro, everything can move fast. It’s safe, easy to use, and affordable for any level of a voice actor.
- A fast processor: Like the MacBook, the Surface Pro has a processor that allows for the use of multiple things at once.
- A good display: The small screen has a quality display for the price. It’s not for gamers, but as a voice actor, your sole focus in the studio should be on recording anyway.
- A quality battery life: Since the Surface Pro is not a laptop, it doesn’t require as much energy to run. Thanks to this, the device can last around thirteen and a half hours before you need to take action and charge it.
The Microsoft Surface Pro 6 is cool because of its size. It can be compressed in a way that the normal laptop cannot, allowing it to fit in virtually any backpack or be carried. The Surface Pro is excellent for those who have a studio but are always on the move.
Find Some Software
Software is necessary to accurately record and store the voice acting that you do. The right software can also be used to edit and send your files straight from the computer, capturing the information.
It can be tricky to figure out which software is best for you in a simple online search, especially in a day and age with so many options on the market. We will go over a few to save you time and energy during your building experience.
The best software for any voice actor to own includes:
- Adobe Audition: This software costs $20.99 a month and is one of the most popular for professional voice actors. Adobe Audition has DeReverb effect, has improved playback recording, allows the running of scripts, and much, much more.
- Audacity: This one is free and also used by many voice actors. Audacity offers great sound quality, the ability to import and export, and editing, among other items. This is a solid free option.
- Pro Tools: Pro Tools will take anything from $25 from your pocket to $500. It all depends on the level that you get. This software is the industry standard and is a bit more advanced than the others. You should only invest in this if you know what you’re doing.
As you can see, there are various prices and features that come with each software. It is up to you to analyze each and decide which will work best for the studio that you’re creating.
Get Yourself a Microphone
A microphone is another critical component of your voice acting studio. Without it, you won’t be able to record your voice and edit it to send off for auditions or jobs.
Choosing a quality microphone will make all the difference when you are trying to capture takes of your acting that are of a professional level.
Many microphones on the market are affordable and intended to be used by those making art with their voice. There are even many that come with a pop filter, which we will dive into later. Some of the best on Amazon include:
These microphones will provide you with a good starting point for your handmade studio. They can all be plugged into the computer, pumping your voice straight into the software that is being used. With any luck, your acting will be crystal clear when you listen to the results.
Purchase a Pop Filter
For new voice actors, this may be the very first time that you are learning about a pop filter. This nifty little device goes in front of the microphone that you are speaking into. They do a lot of things, including:
- Cutting out editing issues with high and low pitches and variations
- Allowing for easier editing
- Creating a better-finished product when all is said and done
Pop filters are used by nearly everyone in the voice acting industry. There are a lot of things to consider when investing in a pop filter. If you decide to get one, you should know the qualities you should consider in a good one. We’ll talk about these in-depth.
Of course, some voice-acting microphones come with pop filters attached. Getting one of these will save you money in the long run as you continue to create your studio.
Qualities of a Good Pop Filter
There are a few things to look for when thinking about investing in a pop filter. Though they are not super expensive, you still want to make sure that you are putting your cash to good use. Look at the following when selecting a pop filter:
- Low cost: A pop filter is not a high-tech piece of material. You don’t need to waste a ton of money on one, so stay clear of super high prices.
- Multiple screens: Some pop filters come with two screens. This allows for your voice to be even more filtered, which is great for the editing process.
- Easy to clean: Make sure that the pop filter you get will not tear or rip easily. As you are going, you need to clean it often.
Looking for these will ensure that you end up with a pop filter that is worth the amount of money that you spent on it. You can take your time buying a good pop filter that will last you for a while.
The Best Pop Filters You Can Buy
There are many excellent pop filters on the market. Some of the best can be bought online for a price that works for many.
The best pop filters that you can purchase on Amazon include:
All of these are under $40, with the Avatone being the most expensive of the bunch. Pick any of these or do your research to find what is best for you.
Headphones?
Headphones are optional when you invest in equipment for your studio. They are most certainly not a must on the list of things you should get, but you should strongly consider them. There are many ways that they can make your life easier in the long run.
Headphones can:
- Help with noise reduction: Wearing headphones will help to prevent the microphone from picking up and sound from your speakers. They will help to make the editing process a bit simpler by doing this.
- Note quality: With the headphones, you can take note of the quality of your acting. You will be able to make tweaks and changes based on what you hear while you are recording.
- Permit focus: With headphones on, the user becomes less distracted by the outside world. You will be able to channel yourself into your work much better than without these items.
Headphones are highly recommended, but you do not have to get them. However, they’ll help you focus and keep your sound on track when you record.
Set Everything Up
Now that you have a soundproofed room, a variety of equipment, and a newfound knowledge of how to record, you can set everything up. It might take a moment to set everything up in the space.
You can go about setting up by:
- Ensuring that you are near outlets to plug your equipment into
- Organizing the items on your desk
- Testing how you would go about recording and adjusting the items to fit
Setting up is one of the most exciting parts of this process. It’s when everything comes together, and you can see your career beginning to form within your home studio.
Ensure You Have a Comfy Place to Sit
Even though much of your voice acting might be done from a standing position, it is still crucial that you have a place to rest your legs. This will come in handy during the editing process or while searching for auditions.
Now that you have all of your equipment set up, it will be much easier to move a chair into the space.
The best chairs are those that provide an adequate amount of cushioning. The ability to swivel is also vital so that you can move around the space freely.
Some of the best chairs for sale on Amazon that will work perfectly for your voice acting studio include:
For quality back support and a seat that provides good cushioning, look no further than this list. You will be provided with a form of rest that will make the editing process go by even faster.
Record Your First Take
Now that you have everything set up, you are ready to accomplish your first take. Sit down, power up your equipment, and prep your voice. Print out your script and get ready to take on the voice acting world.
With your studio, you will have a newfound confidence in your career. With privacy and the ability to create whatever you want in your own home, you can work on your skills as you’ve never been able to before.
Sources:
https://www.wikiaudio.org/best-pop-filter/
https://www.sagaftra.org/create-home-voiceover-studio-pro
https://transom.org/2013/voice-recording-in-the-home-studio/
![Kaotica Eyeball vs Fatboy: ALL You Need to Know [2023]](https://performerlife.com/wp-content/uploads/2022/05/Kaotica-fatboy-211x150.jpg)
![What Happened To “Chief Keef”? [Everything to Know About This Rapper]](https://performerlife.com/wp-content/uploads/2022/05/Chief-Keef-211x150.jpg)