Although the ultimate aim of playing a musical instrument is to [somehow] get heard, there, however, will be times you don’t want to get heard. Just like in the brass and woodwind families, the guitar sometimes could benefit from some muting.
There could be a variety of reasons guitarists would want to be muted. It could be to add some unique effects to their playing and it could also be because they don’t want to disturb neighbours while practising.
Although the guitar is not a naturally loud instrument when played acoustically, there are certain times its sound could still be an environmental nuisance to some people. However, there are certain things you could do to reduce this level of nuisance to others.
Some of these things are only practical to a certain extent and may not totally remedy the situation. For example, you could use your palm to mute the strings while playing. But this can be technically challenging (especially for beginners).
Also, it might not be practical to palm-mute your guitar throughout your entire practice session. Another thing you could do would be to fill the sound hole of your guitar with some clothes. This way, the volume will be significantly reduced.
But come to think of it, the idea and the sight of having clothes tucked into your guitar soundhole are not exactly the most appealing.
However, the good news is that some manufacturers have designed some very effective materials and pieces of equipment to mute your guitar when the need arises. There are several reasons players would want to mute their guitars.
Some don’t mute because it is disturbing others; they rather mute because they want to achieve a certain tonal character for a certain playing scenario. For example, session guitarists who record in the studio might mute to achieve a more record-friendly kind of sound.
It doesn’t matter what your reasons for muting the guitar are, in this article, we will discuss guitar mutes in-depth and thus present a solid framework for you to understand both the tools and the concept.
Table of Contents
Guitar Muting – The Concept
If you are a fan of rock, metal, fast riffs or even just rhythmic guitar tunes, you have most likely heard muting. The tricky thing is muting actually silences, or even completely mutes, certain strings while others are being played.
While you can’t hear the silent strings, it makes a tremendous impact on the sound that the other strings are making. It leads to more clarity and accuracy in the sound.
Muting can also be used to achieve different tonal characteristics of the strings you are playing. For instance, if you are playing the E note on the D string, you will notice that the high E and the low E will both resonate.
The harder you play the E on the D string, the more prominent the resonance on the other two E strings. Naturally, this will lead to background noise and will even distort the sound of the string you are playing.
For the casual player, this may not be much of a concern since their hearing is not receptive enough to hear these differences.
However, when you are recording in a studio environment, playing as a professional guitarist or playing more complex riffs, you will start to notice how this little bit of resonance can hinder the overall performance.
Moreover, the way a string resonates, whether it is the string you are playing or a different string that happens to be at the same frequency, has an impact on the sound of the note you are playing.
For instance, if you are playing the G chord, the open (D, G and B) strings will also be resonating. However, you can partially mute the E, A and low E strings to achieve a different sound.
This is especially prominent when you are strumming the strings. Partially muting them as you strum will make an interesting change to the sound of the chord overall.
Alternatively, if you wanted to completely isolate the chord strings, you could mute the non-chord strings while you strum.
Speaking of tonal changes through string muting, you can also achieve a quieter, gentler sound through muting. By limiting how much a string (or multiple strings) are able to resonate you can play with the volume output of the instrument.
This is particularly useful when you want to create those dips in the guitar sound for gentler pieces, or for that ‘background guitar’ effect in a performance.
There are a few different things that you can do, and a few different tools you can use, to get the desired mute effect. In the next section, we will look at what you need to do this right.
Guitar Mutes – The Tools
There are a few different ways you can go about muting your guitar. This will depend on what kind of guitar you have (electric, acoustic or bass) and what kind of muting best suits your needs and your style of playing.
The objective is to get the right kind of sound, not use the ‘best’ form of muting. Something that works for someone else may not be the best solution for your particular needs. You can experiment with a few different muting solutions discussed here to see what works best for you.
Essentially, guitar mutes are designed to reduce the resonance (vibration) of certain strings. Most guitar mutes will isolate all the strings to some degree so you can just focus on playing the strings that you need to.
In this way, everything other than what you are playing will be muted. You can get plenty of pre-made products for this purpose or you could even fabricate something for yourself. Let’s look at some of the different guitar muting options.
Soundhole Mutes
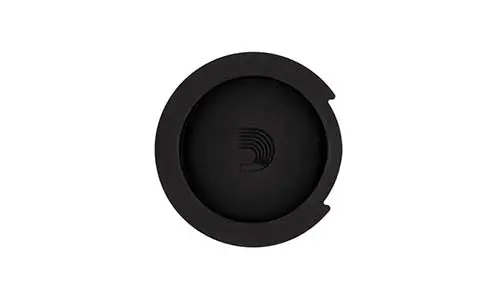
One of the most common options for acoustic guitars is soundhole mutes. This can be used on both acoustic and semi-acoustic guitars since they both have a soundhole cutout. This is a simple device that you just plug into the soundhole and away you go playing.
Usually, these are made of propionate plastic or any other high-density plastic. However, you can also get some soundhole mutes made of materials like ash or mahogany.
This is particularly useful for musicians who are performing on stage or playing in a studio or any closed environment. In such scenarios, there is a lot of feedback going into the guitar.
Stage performers typically have monitors facing them so they can hear the music and in the studio there are walls close by so soundwaves are bouncing off those and entering the guitar making it sound muddy and unpleasant overall.
The soundhole mute is a physical barrier that blocks off the soundhole. So you don’t have that problem anymore. Also, this is a great way to minimize extra resonance from the guitar itself when you are playing.
This way, the extra sounds created by other strings will be limited since it is not able to come out of the sound hole.
Here is a good video demonstrating soundhole mutes:
| Pros | Cons |
| A solid barrier that blocks sound going into the guitar and sound coming out of the guitar. | It mutes the entire sound spectrum |
| Very easy to set up since you don’t need to calibrate it correctly. Just plug and play. | There is no way to adjust how much sound dampening you get. It’s either on or off. |
| Inexpensive | Can be too much sound dampening for people using acoustic guitars |
Capos
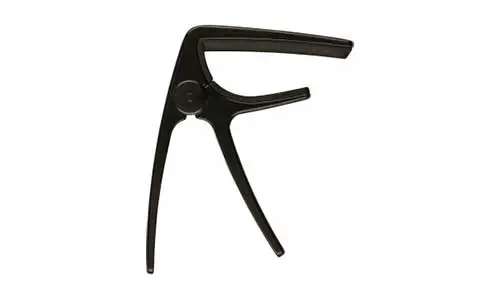
Capos are among some of the most commonly used guitar equipment. Specifically, these devices are commonly used in genres such as blues, folk, rock, flamenco, Irish guitar music and others. They are rarely used for classical guitar or jazz.
The purpose of the capo is to change the pitch of an unfretted string. You could say that the capo is like a moving nut since you can place it anywhere you like and continue playing on a shorter pitch.
It’s important to note that the pitch of the fretted note does not change with a capo. This is why it is commonly used in styles where strumming is preferred. It makes the pitch of the strings resemble instruments with shorter scales such as the mandolin.
When a capo is applied to a fret, the length of the string beyond that fret till the nut of the guitar is completely muted. In this way, it can be used as a muting device to mute out unneeded tones by blocking entire sections of the fretboard.
Also, modern capos have the ability to mute one, two, three, four, or five strings, as well being able to block the entire six-string fretboard. In the past, capos could only be used on all the strings.
However, the modern capos that can block out selected strings can be great for muting strings that don’t need to be played and also whose resonance is unwanted.
Depending on the guitar you have and the performance you need there are several types of capos that you can choose from.
Here is a good video covering capos:
| Pros | Cons |
| Excellent for muting specific strings | It does limit playability since the base pitch of the string is changed |
| Quite good at muting as the capo clamps down on the string with quite a bit of force | Can be a problem if you need to revert to the natural pitch of the string during a riff |
| Helps to add character to the sound |
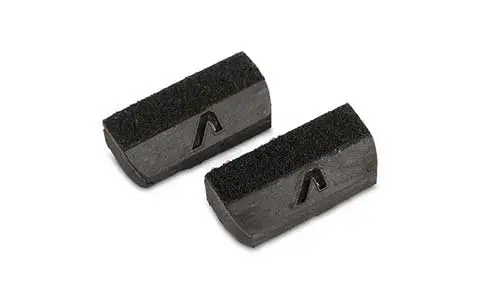
Practice mutes
Tremolo mutes, also known as practice mutes, are a fantastic bit of equipment that can very effectively mute all six strings. As the names of this mute imply, it is designed to help people to practice their tremolo techniques without disturbing others.
Tremolo, as well as many other classical guitar playing techniques, require hours and hours of repetition of the same movement to develop fluidity, speed and rhythm. For people in the vicinity, this can be quite troublesome.
The practice/tremolo mute is a small piece of rubberized material with a foam/sponge base. It is about as long as the distance from the top E to the bottom E and is slightly thicker than a pencil.
This small accessory can be installed underneath the strings on the guitar near the bridge or even near the neck if you have room after the last fret and the soundhole/pickups. This way, the tremolo mute stays out of the way.
It stays in contact with all the strings, and can therefore be used with virtually all playing styles without being a real problem.
Here is a great video covering the tremolo mute
| Pros | Cons |
| Easy to customize for different guitars. Simply add extra foam (provided with the package) to increase the height and adjust it to your guitar’s action. | May not be perfect for very high-speed playing |
| More absorbent than regular foam and leads to an equally dampened sound across all the strings. | It isn’t tied to anything or stuck to the guitar in any way so there is a chance that it can fall out. |
Fret Straps

One of the most popular options when it comes to string muting is fret straps. These are an excellent choice for both acoustic and electric guitars. These are available in different sizes and in different styles to suit your needs.
Essentially, the fret wrap is a band or a strip of fabric that can be tied around the neck of the guitar so it presses against the strings and dampens them.
In some cases, this will have a velcro strap around the back so you can stick it in place while some models may have buttons so you can clip it shut. There is a plastic loop on the back through which you can adjust how tight you want it to wrap around the guitar.
You can also get fret straps in different thicknesses depending on how much dampening you want. Moreover, you can adjust how tightly they are wrapped around the guitar’s neck to adjust how much dampening they provide.
Some players also choose to use multiple fret straps on their guitars to get a higher level of dampening while keeping the string tension low.
Generally, fret straps are used around the nut of the guitar. However, some players do use them lower down on the neck or even at the base of the neck.
Tying the fret strap lower down on the neck is more useful for tapping and other high-fret manoeuvres since it is better at isolating the strings in that region.
However, it does leave the nut of the guitar exposed which can lead to overtones when you are playing at the end of the neck.
How you use the fret straps depends on your personal playing style and what fits on your guitar best.
Here is a good video discussing fret straps.
| Pros | Cons |
| Fret straps press against all the strings evenly providing equal dampening throughout. | They dampen all the strings so they aren’t suitable for people who need to just isolate specific strings. |
| They are easy to use and you can even leave them on your guitar once installed. | |
| They provide different levels of dampening depending on how you adjust them. |
Noise Gate Pedals

If you are using semi-acoustic guitars or electric guitars then you might want to consider adding a noise gate pedal to your pedal board. These little devices help ‘clean’ the sound coming from your instrument on its way to the amp or the recording media you have set up.
However, these function a little differently from traditional muting options in that they don’t physically impact the movement or resonance of the strings rather they modify the digital signal they receive.
In particular, noise gates are useful for eliminating that humming and hissing sound that you get from electric instruments. It also helps to reduce any unwanted frequencies during intervals while you are playing.
Here is a good video demonstrating noise gate pedals
| Pros | Cons |
| An excellent solution for recording or for where you need to further process the digital signal. | This will reduce sustain by quite a margin. |
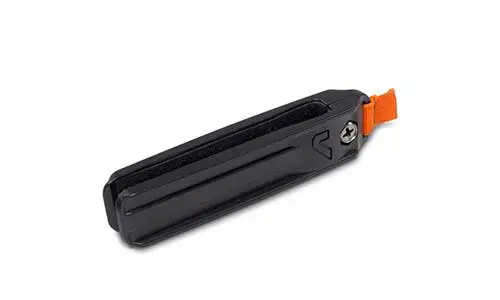
Headstock Dampener
A headstock dampener, also known as a fret wedge, is another good option for muting your guitar. This is a versatile bit of kit that can be used with nearly any kind of guitar that has a headstock and a nut that has some room behind it where you install the wedge.
If you are using a headless guitar then this won’t be a feasible option since it gets ‘wedged’ under the strings after the nut.
The fret wedge has a velcro-like top surface which is the part of the wedge that is actually in contact with the strings. The body of the wedge is made of rubberized plastic and has a memory foam base.
This way, the wedge can mould itself to the shape of the space under the strings above the nut of your guitar. This fret wedge is available in different sizes to suit the size of the space on your guitar.
This is an excellent choice if you want to get rid of those extremely high-frequency overtones that you can get from guitars especially when playing on high-gain. You can also pair these with a fret strap so you are damping both the higher frequencies and the lower frequencies.
Here is a good video covering the headstock dampener.
| Pros | Cons |
| Very easy to use and install | Does Not address lower frequencies very well |
| It’s not intrusive at all since it doesn’t take up any space on the fretboard itself | |
| Excellent solution for high-gain use |
Bridge-side Dampeners
If you are a bass player and you are after that staccato sound but don’t want to use your hand, then the bridge-side dampeners are for you. These smart little devices simply clip onto the bridge side of your bass or electric guitar.
It mutes your strings for a more compact, focused and accurate sound. It also gives you the freedom to strum with more momentum to get that rhythm right while not ruining the sound due to overtones or extra resonance.
You can get these clip-style dampeners in a couple of different sizes to suit the size of your guitar. It has a simple clip-on system so you can clip it onto any part of the guitar but it works best by the bridge or just under the neck.
On the inside, it features rubberized pads that actually come in contact with the strings. These pads are also replaceable so you can always change them for a fresh set when you feel like the dampening is getting less effective.
Since the rubber grips stay in contact with the strings, they develop grooves over time which makes them less effective for damping, so being able to change them out really helps.
Here is a good video demonstrating the bridge-side dampeners
| Pros | Cons |
| Very easy-to-use clip-on functionality | Does wear out over time so it can be a little inconsistent in performance |
| Works great for bass guitars and electric guitars alike | There is no way to adjust how much dampening you get. |
Other Ways to Quieten the Guitar
Besides tools and premade products, there are a number of DIY options for muting your guitar. With a bit of creativity, you can use things from around the house to dampen the strings on your guitar in a few different ways.
You can also set up your guitar a bit differently to dampen the sound and reduce unwanted frequencies. Here are some options you can explore.
String Choice
If you want to reduce the overall sound and also reduce the amount of indirect resonance from the strings, consider replacing the strings altogether.
Some players prefer a guitar that is generally quieter and less responsive to playing leading to a lower volume output and also less noise. To achieve this, consider thinner strings (if you are using metal) or consider shifting to nylon strings from steel strings.
As steel strings are heavier, they are more receptive to vibrations and due to their weight also produce a lot more dB output. Nylon strings are far lighter and lead to quieter playing overall.
String Tension
Another temporary fix to problematic resonance is string tension. If you notice that a certain string (or set of strings) is problematic when you play, you can reduce the string tension on those strings.
Alternatively, you can reduce the string tension on all your strings to make them less receptive to vibrations. However, this may not be an option for situations where you need high string tension to play the piece you are playing.
For instance, if you want to play a high-speed riff, shred, or tap, then having high spring tension is necessary. However, the spring tension hack can be a temporary fix to the problem.
DIY Soundhole Insulation
Soundhole insulation is one of the best solutions when it comes to removing unwanted sounds. However, that doesn’t mean you need to use premade soundhole covers.
Some people might not be able to get soundhole covers due to availability, price or because they can’t find the right size for their particular guitar. Luckily, there are a few things you can do to work around this problem.
The objective is to fill the soundhole with some kind of filling so that it doesn’t receive soundwaves or push out soundwaves as much.
You can do this by stuffing an old shirt into the soundhole, filling it up with bits of foam, or even using wall insulation material to fill up the hole. This will drastically mute the instrument and also restrict unwanted frequencies.
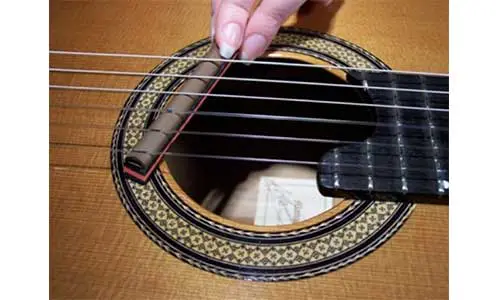
Rubberband Over The Saddle
Another interesting solution is a DIY remedy for a bridge dampener. If you don’t have a bridge dampener, you can use a simple rubber band and wrap/tie it around the saddle.
This way, you are coupling all the strings together but more importantly, you are removing extra resonance.
The extra resonance from the strings will be absorbed and distributed by the rubber band. If you feel like you want more dampening, just add another rubber band.
Also, experiment with different tautness levels of the rubber band. The tighter you tie the band around the saddle the more dampening it will provide.
String The Saddle
Another bridge-side modification you can make to dampen the sound is to string a shoelace or a piece of thin rope through the saddle. You can weave this across the strings in an up-and-down fashion or you could even loop it around the nuts.
Again, this is a DIY option that does help to reduce string resonance and noise but you need to experiment a bit to see what works best for your particular guitar. You can use thicker shoelaces, or more than one shoelace, to get more dampening.
Bridge Foam Mutes
This is one of the oldest DIY fixes for resonance and damping. It has been used on all kinds of stringed instruments and there is plenty of room for modification.
The idea is to simply place a strip of foam or sponge underneath the strings near the bridge. Some people like having the foam touching the bridge, and others have it a few millimetres away from the bridge. You can try it in different positions to see what works best for you.
Also, you can experiment with foams and sponges of different densities to see what works best for you. Generally, the denser the foam the more it will dampen the sound.
Hand Muting
Perhaps the most common form of muting, what many would consider the ‘traditional’ way of muting, is to simply use your hand to mute the strings that you don’t want vibrating.
There are quite a few ways that this can be done. Some of the most popular techniques include thumb muting, palm muting and fret-side hand muting.
Some players will also use a combination of bridge-side and fret-side hand movements to mute different strings while they play.
This is a popular technique because it gives you a lot of versatility and flexibility. You can mute virtually any string, at any point, simply with a light touch of your hand. Moreover, you can deliver different levels of dampening depending on how firmly you touch the string.
This technique does take practice but once you have it dialed in it is one of the most efficient dampening techniques.
Pros and Cons of Using Guitar Mutes
Like with anything else, using guitar mutes gives you some advantages but also has some limitations. Here we look broadly at the pros and cons of using mutes with your guitar.
Pros
- It helps to remove unwanted sounds from the guitar whether that is due to feedback from the environment, resonance, overtones, or anything else that is making sound in the guitar body.
- Muting, especially hand muting, gives you the ability to play around with the tonal characteristics of the sound that your guitar makes. You can use muting to not only enhance the notes you are playing but create rhythms using the muting.
- It helps to achieve a much cleaner and more accurate sound from your guitar. This is especially helpful in situations where you have no room for inaccuracies such as studio recordings or live performances.
- Muting can work with a wide variety of instruments and can enhance the sound of all those instruments.
Cons
- Some muting tools or techniques will mute more than you want them to. For instance, bridge-side dampening clips will mute all 6 strings and this might be overkill for some players or in some situations.
- Manually muting strings is not easy to do and it can be quite a learning curve. This can put many new players off since they now have to not only learn to play correctly but also to mute correctly.
- Muting can also impact other aspects of the sound that you may not want to change. For instance, the sustain and the timbre of the sound also tend to go down when strings are muted. So it is a give-and-take situation where you are compromising sound quality for accuracy.
- If you are using tools, even DIY ones, it only adds to the list of things you need in your equipment. This can be difficult for travelling musicians or people who just like to be out and about with their instruments.
Conclusion
Overall, muting is a powerful tool and a skill that any player can benefit from. However, it really boils down to your style of playing and what your real needs are. For the casual player, muting might not even be necessary while for the performer it could be essential.
Also, there are various ways to achieve muting. So there is no harm in trying out a few different ways to see what works best for you and then you can proceed to really master that one art of muting.
![Fender Super Champ x2 vs. Blues Jr [Tones, Features, Versatality, etc..]](https://performerlife.com/wp-content/uploads/2022/09/fender-super-champ-x2-vs-blues-jr-211x150.jpg)